Monday, December 13, 2021

Miniature Farmhouse Chair Tutorial

Hello Mini Lovers!!  Today I am sharing a miniature farmhouse chair that I made.  I know chairs can be easily purchased and painted but isn't is more fun to say "I made that"?!?!

I made this chair from premade spindles purchased from Etsy, toothpicks, a piece of balsa wood for the back and a piece of heavier craft wood (can't remember the name lol) for the seat.


I don't use fancy tools.  Mainly to cut wood I use an exacto knife or kitchen shears.  To sand I use a fingernail file or sandpaper.  I also like to use a little fingernail kit that I've had for years.


I sanded the leg ends at an angle then glued onto the bottom and two on the back.  These usually come in a pack of eight and I always save the parts I didn't use.  They come in handy for other projects.


I painted some brown splotches over the chair where I wanted chippy paint to look old.  I painted school glue over the brown and then painted white paint.  Don't let the glue dry before you do this part.  As it dries the white paint will crack exposing the brown paint underneath.


Thursday, November 18, 2021

Miniature Country Kitchen Sink Tutorial

Hello All!!  Today I am sharing a Country Sink that I made last year.  The list of ingredients used are Balsa wood, premade spindles, popsicle sticks, fancy toothpicks, and old pieces of jewelry.  I don't have any picture of me making the actual sink.  I made it from Sculpey clay and baked it.  It is definitely not perfect but truthfully I like it that way.  The dimensions of the whole cabinet are just under 5 inches tall by 4 inches wide by 1.75 inches deep.  The height to the countertop is 2.75 inches.    


I cut three pieces of balsa wood and cut out the area for the sink from one of them.  I then cut my premade spindles (purchased from Etsy) into the lengths needed to separate the shelving.. 


For the back I just cut the tips off of popsicle sticks and glued them on the back.  I finished it off with a skinny stick on top.  I made a peg shelf from balsa wood and used fancy toothpick ends from Cracker Barrell so my mini friends could hang 


I hunted up some old pieces of jewelry to make the faucet out of.  The water spout is an old belly ring lol.  I just glued them onto a tiny piece of balsa wood and placed it behind the sink.


I think the drain stopper is my favorite.  It has a tiny old shell button for the stopper.


There you have it.   A Country Kitchen sink.  

If you like this creation please share it to pinterest below.

XOXO


Thursday, October 21, 2021

Miniature Vintage "Iron" Bed

 Most miniatures take a lot of patience.  This particular miniature, while it seems easy now that it's finished, took a lot of patience.  The beginning of it has been in the works in my head for months.  I wanted a vintage metal bed for my cottage.  The bedroom is an attic room and a normal sized bed is just too big and takes up the whole room.  I needed to make it.  I've tried on a few occasions to use glue, or fancy metal glue, and even once tried to get my husband to help fuse pieces together.  I felt like I was thinking too much about it.  So I let the project sit.  Until yesterday when a picture popped up on my Instagram feed and gave me the courage and the patience I needed to begin,,, again.  

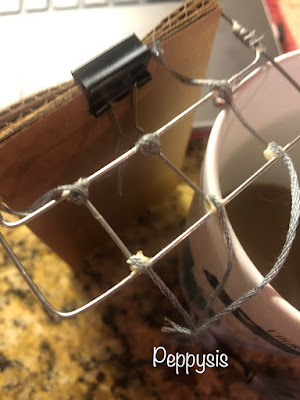
For the metal head board and foot boards I used some wires left over from Chinese food take out boxes that my sister saved for me.   I used two wires for each end.  One of them the complete wire and the other I cut up into a second bar on the frame and three pieces as rungs.  

I am an avid Elmer's Wood Glue user so I got out my old faithful glue.  I don't know if it helped, but an IG mini-maker said once to sprinkle with baking soda also so I did that too.  Please see below.  Also, I didn't take a ton of pictures along the way because I truly didn't think it would work.  As Julia Child would say "I didn't have the courage of my convictions."


This picture also shows a piece of balsa wood that I wound up not using.  I instead used good old cardboard.  


Here is my piece.  Taped down, glued and powdered with baking soda.  I gave them plenty of time to dry (maybe an hour lol).  One of them wound up totally falling apart.  I knew I needed to use reinforcements... literally.


As you can see in the pic above, the wire has little feet.  I used a couple of layers of cardboard and stuck and glued the feet into the layers but not all the way through. 


I then used cross stitch floss where the metal was glued together.  I placed a dollop of glue then the end of a piece of floss and let it dry.  I then put more glue and carefully wound the string around and crisscross finally gluing the end of the string.  I let these dry and then began to paint.  So far they have held together well.


It's not perfect but that's the whole point.  I want this to look like a very old bed.  


I used brown and orange paint to make the frame look rusted and aged.  
  

I have one layer of lace trim for the dust ruffle here.


And here I have added another ruffle layer for depth and color.  And I also made a mattress this morning that I LOVE!


It's not totally complete yet.  But isn't it lovely???  The pink velvet throw needs work.  It might not stay unless I can tame it.  

If you like this bed semi-tutorial, please share to Pinterest below. 

Thanks so stopping by!!  XOXO